
Imagine you have a secret tunnel that lets you send letters to a friend across the city without anyone else seeing them. A Linux GRE tunnel (Generic Routing Encapsulation tunnel) works similarly in the online world. It’s like a special, invisible tube that stretches between two points on the internet. Inside this tube, your data travels safely, hidden from the outside world, allowing computers to talk to each other securely and privately, no matter how far apart they are. It’s like sending your messages in a secure, invisible envelope that only you and your friend can open.
Technically speaking, a GRE tunnel is similar to a VPN because it wraps different network protocols inside IP tunnels. This wrapping helps connect networks over the internet safely and privately.
In this tutorial, we set up a GRE tunnel between two Linux servers in a step-by-step approach to understand and set it easily.
A GRE tunnel works much like a VPN, but it doesn't encrypt packets. They're just encapsulated in a GRE header. So, if you're looking to keep your data encrypted, you'll need to set up IPSec as an additional step.
Setting Up GRE Tunnel
Update Your System:
Ensure both Linux servers are updated to avoid any compatibility issues. Execute the following command to update it:
sudo apt update && sudo apt upgrade -yLoad the GRE Module
The ip_gre module lets your Linux system use GRE tunnels, which help different networks connect over the internet. To use it on your servers, simply load this module into your system’s kernel with the following command:
sudo modprobe ip_gre && lsmod | grep greThe output will look like this:

Creating the GRE Tunnel
Server A
Create the GRE tunnel:
To establish a GRE tunnel between ServerA and ServerB. Execute the following commands to configure the tunnel between them:
sudo ip tunnel add gre1 mode gre remote ServerB_IP local ServerA_IP ttl 255Replace ServerB_IP with the private IP address of Server B and ServerA_IP with the private IP of Server A
For example; if the private IP of Server A is 172.31.47.239 and Server B is 172.31.36.233, then the command will look like this:

Assign an IP address to the GRE tunnel interface:
Assign a tunnel IP address for both Server A and Server B. Ensure the IP addresses are part of a separate subnet that’s different from the main server IPs.
sudo ip addr add TunnelIP_A peer TunnelIP_B dev gre1Here replace TunnelIP_A with the desired private IP address for Server A within the tunnel network.
For example, if we are assigning 10.0.0.1 for the tunnel interface of Server A and 10.0.0.2 for Server B, the command will look like:

Note on GRE Tunnel IP Addresses

When setting up a GRE tunnel between servers, the IP addresses assigned to the tunnel interfaces (e.g., 10.0.0.1 on one server and 10.0.0.2 on the opposite server) are considered virtual IP addresses. These addresses are used exclusively for communication over the GRE tunnel and do not need to be configured as part of the server's physical network interfaces or added through the cloud provider's management console.
Bring the GRE tunnel interface up:
Bring the GRE tunnel interface active and running by executing the following command:
sudo ip link set gre1 upServer B
On Server B, do the same but in reverse, replacing ServerA_IP with the IP address of Server A, and TunnelIP_B with the desired IP address for Server B within the tunnel network.
sudo ip tunnel add gre1 mode gre remote ServerA_IP local ServerB_IP ttl 255

sudo ip addr add TunnelIP_B peer TunnelIP_A dev gre1

sudo ip link set gre1 up
Example command prompt:

Testing the Tunnel
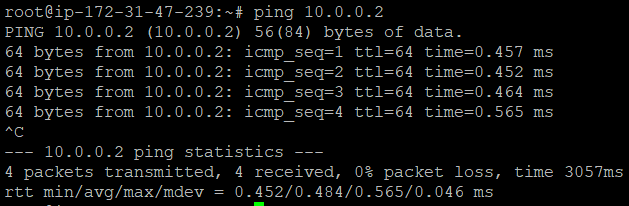
Ping the tunnel IP address of Server B from Server A to ensure the tunnel is operational and vice-versa.
ping TunnelIP_BIf you receive a response like the below screenshot, your GRE tunnel is correctly set up and operational.
If ping doesn't work!

1) Make sure to check IP forwarding on both servers, if it was disabled you can enable it by executing the command: sysctl -w net.ipv4.ip_forward=1
2) Ensure ICMP traffic and port 47 traffic for GRE is allowed on server firewall.
🖥️⫘⫘⫘🖥️
GRE tunnels are great for straightforward IP tunneling where encryption isn’t a priority, offering a simpler, faster solution. However, when privacy is essential add IPSec to this setup to make the moving data encrypted through the tunnel. Choose based on your need for speed or security.
In conclusion, with a few simple commands from this tutorial, you’ve built invisible bridges between two servers with the Generic Routing Encapsulation Tunnel. Off you go, happy tunneling!