The following are the steps to be followed to set up the nameservers for a cPanel server. This instruction set has been divided into two because the configuration must be done at the domain registrar and the cPanel.
Domain Registrar
- Registration of the domain at a domain registrar: The client owns a domain address. This can be used to set up nameservers for his hosting server. The client can purchase a domain from Veeble. They could also use an existing domain that has been purchased from any other registrar.
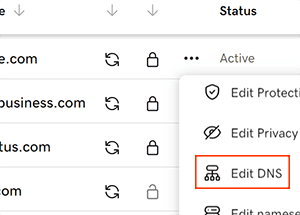
- Setting up child nameservers or hosts: If you are using a domain registrar provider say Godaddy. You can find the Edit DNS option available to your registered domain address. Click on this option to find the option Hostnames.
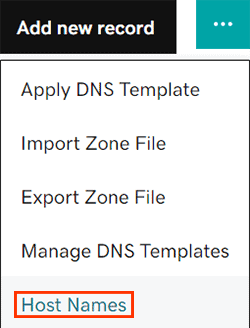
Here you can create custom nameservers for example.
NS1.EXAMPLE.COM
NS2.EXAMPLE.COM
For each of the above child hosts, you have to assign the IP address of your purchased cPanel server. If you have multiple IP addresses assigned to your cPanel, you can choose which IP address to be used for your nameservers. - Updating the created hosts as nameservers: Once the child nameservers/hosts are created they are now ready to be used as the nameservers for any domain that you host on your server. You can also host the domain that you used to create the nameservers as well. In the DNS settings of your domain click on Nameservers. Now click on the option I’ll use my own nameservers to update the nameservers that you have just created in step 2.
cPanel
- Open the WHM portal.
- Go to Server configuration >> Basic Webhost Manager
- Update the field nameservers with the child hosts created at the domain registrar.
- Click on Save Changes.