Setting up an FTP (File Transfer Protocol) server is a common requirement for businesses and individuals who need a reliable method for transferring files over a network. The Very Secure FTP Daemon (VSFTPD ) is one of the most popular and secure FTP servers available on Linux. It offers a robust and efficient solution for hosting an FTP server, with a strong focus on security features. vsftpd supports both IPv4 and IPv6 and provides options for secure data transmission, including SSL/TLS encryption.
As a server administrator, I’ve navigated through numerous challenges and explored various solutions in my quest to establish a secure and efficient file transfer system. My journey led me to VSFTPD (Very Secure FTP Daemon), a choice that stands out for its robust security features and remarkable performance. Here, I share step by step guide of installing and configuring VSFTPD on an Ubuntu server.
Prerequisites
- An Ubuntu server
- Root access or a user with sudo privileges
- Basic familiarity with the command line interface
Step 1: Installing VSFTPD
- Update the Ubuntu Package Lists: First, make sure your package lists are up to date.
root@ervintest:~# apt update2. Install VSFTPD: Use the apt package manager to install VSFTPD.
root@ervintest:~# apt install vsftpd -y
3. Start and Enable the VSFTPD Service: Ensure the service starts automatically upon system boot.
root@ervintest:~# systemctl start vsftpd
root@ervintest:~# systemctl enable vsftpd
4. Check the Service Status: Verify that the service is running smoothly.
Step 2: Configuring VSFTPD
- Backup the Original Configuration File: It’s a good practice to back up the original configuration file before making changes
root@ervintest:~# cp /etc/vsftpd.conf /etc/vsftpd.conf.backup
2. Editing the Configuration File:
- Open the configuration file in your preferred text editor.
root@ervintest:~# nano /etc/vsftpd.conf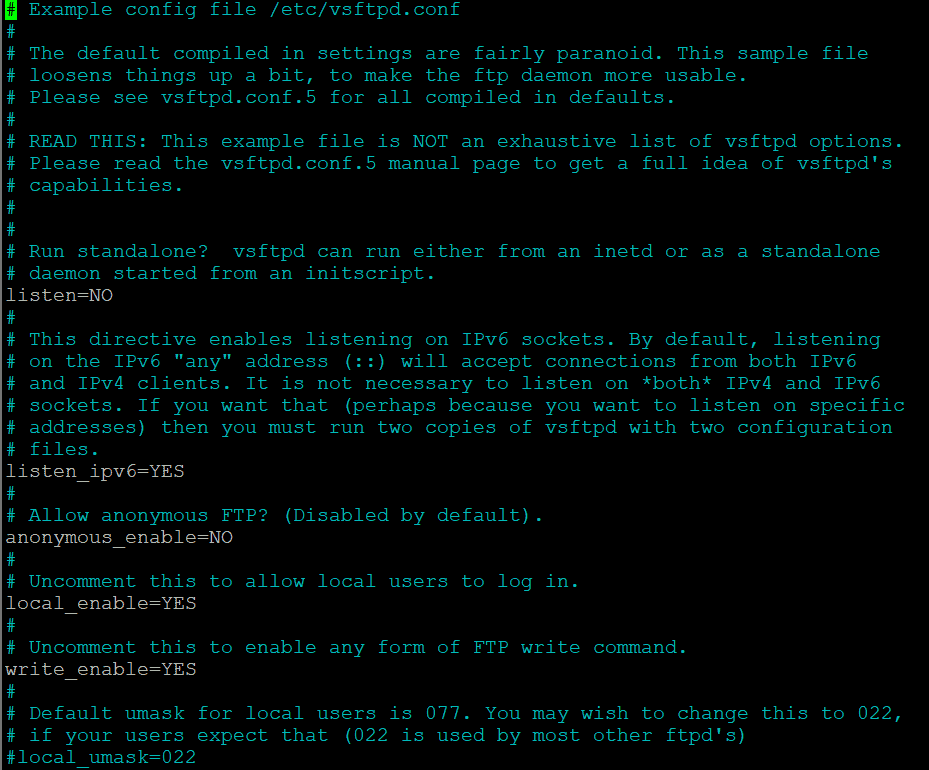
2. Modify or ensure these lines are set as follows to enhance security and functionality:
listen=NO
listen_ipv6=YES
anonymous_enable=NO
local_enable=YES
write_enable=YES
chroot_local_user=YES
allow_writeable_chroot=YES
pasv_min_port=10000
pasv_max_port=10100
user_sub_token=$USER
local_root=/home/$USER/ftp
Adjust the passive port range (pasv_min_port and pasv_max_port) according to your needs and firewall settings.
3. Save the changes and exit the editor. In nano, you can do this by pressing CTRL + X, then Y and Enter.
Step 3: Create an FTP User
- Create an FTP user and set a password:
root@ervintest:~# adduser ftpuser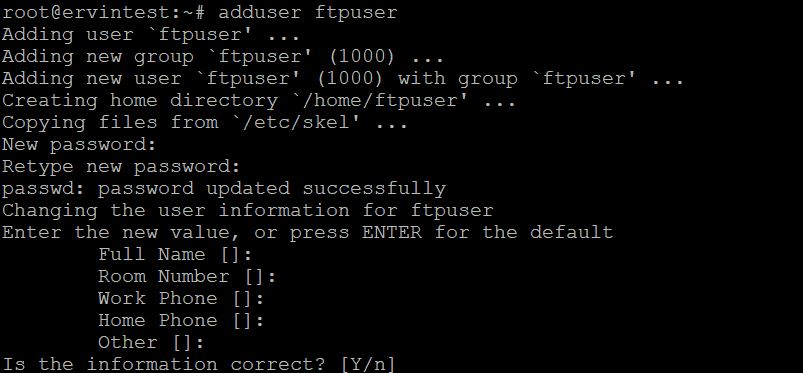
2. Create a directory for FTP access and set permissions:
root@ervintest:~# mkdir -p /home/ftpuser/ftp
root@ervintest:~# chown nobody:nogroup /home/ftpuser/ftp
root@ervintest:~# chmod a-w /home/ftpuser/ftp
root@ervintest:~# mkdir /home/ftpuser/ftp/files
root@ervintest:~#  chown ftpuser:ftpuser /home/ftpuser/ftp/files
Step 4: Restart vsftpd
For the changes to take effect, restart the vsftpd service:
root@ervintest:~# systemctl restart vsftpdStep 8: Test the FTP Connection
Test your FTP server connection using an FTP client like FileZilla . Enter the password, username, and IP address of your server. You should be able to login to your server and move files if everything is configured properly. To know more about Filezilla FTP client configuration, visit https://www.veeble.org/kb/configuring-filezilla/ .
