Unlocking the Magic of DNSSEC: Protecting Your Domain:
What is DNSSEC (Domain Name System Security Extensions)?
Imagine the internet as a vast library, where every website is a book filled with information. The Domain Name System (DNS) acts as a group of friendly librarians who help you find the right books by translating website names (like www.domain.com) into their actual addresses (like 192.0.2.1).
But here’s the twist: in this enchanting library, mischievous book thieves sometimes swap labels on the shelves. They can make you think you’re reading about cute kittens when, in reality, you’re entering the dragon’s lair! That’s where DNSSEC comes to your rescue.
DNSSEC, the Mystical Protector:
DNSSEC adds an invisible layer of enchanted seals to those bookshelf labels. These seals are like unbreakable magical wards. When you ask the librarians (DNS servers) to find a book (website), they not only show you the book (website) but also prove that it’s the real deal—untampered and authentic.
In the real world, DNSSEC establishes authenticity by using cryptographic keys. These keys are like secret codes that confirm the identity of a website. Here’s how it works:
- Private Key (Hosted by Your Hosting): Think of this as the secret key held by the website’s owner. It’s used to sign (or seal) the information about the website. Your hosting provider keeps this key safe and secure.
- Public Key (Generated by Your Hosting, Held by Domain Registrar): This is like the lock that fits the website’s secret key. It’s generated from the private key and is publicly available. Your domain registrar holds this public key, and it helps anyone verify that the information sent from the website is indeed from the right source.
So, when you visit a website protected by DNSSEC, your device uses the public key from the domain registrar to check the digital seal (signature) on the website’s information. If the seal matches the private key held by the hosting, it’s like a magical stamp of authenticity, ensuring you’re on the genuine website, not a trickster’s lair.
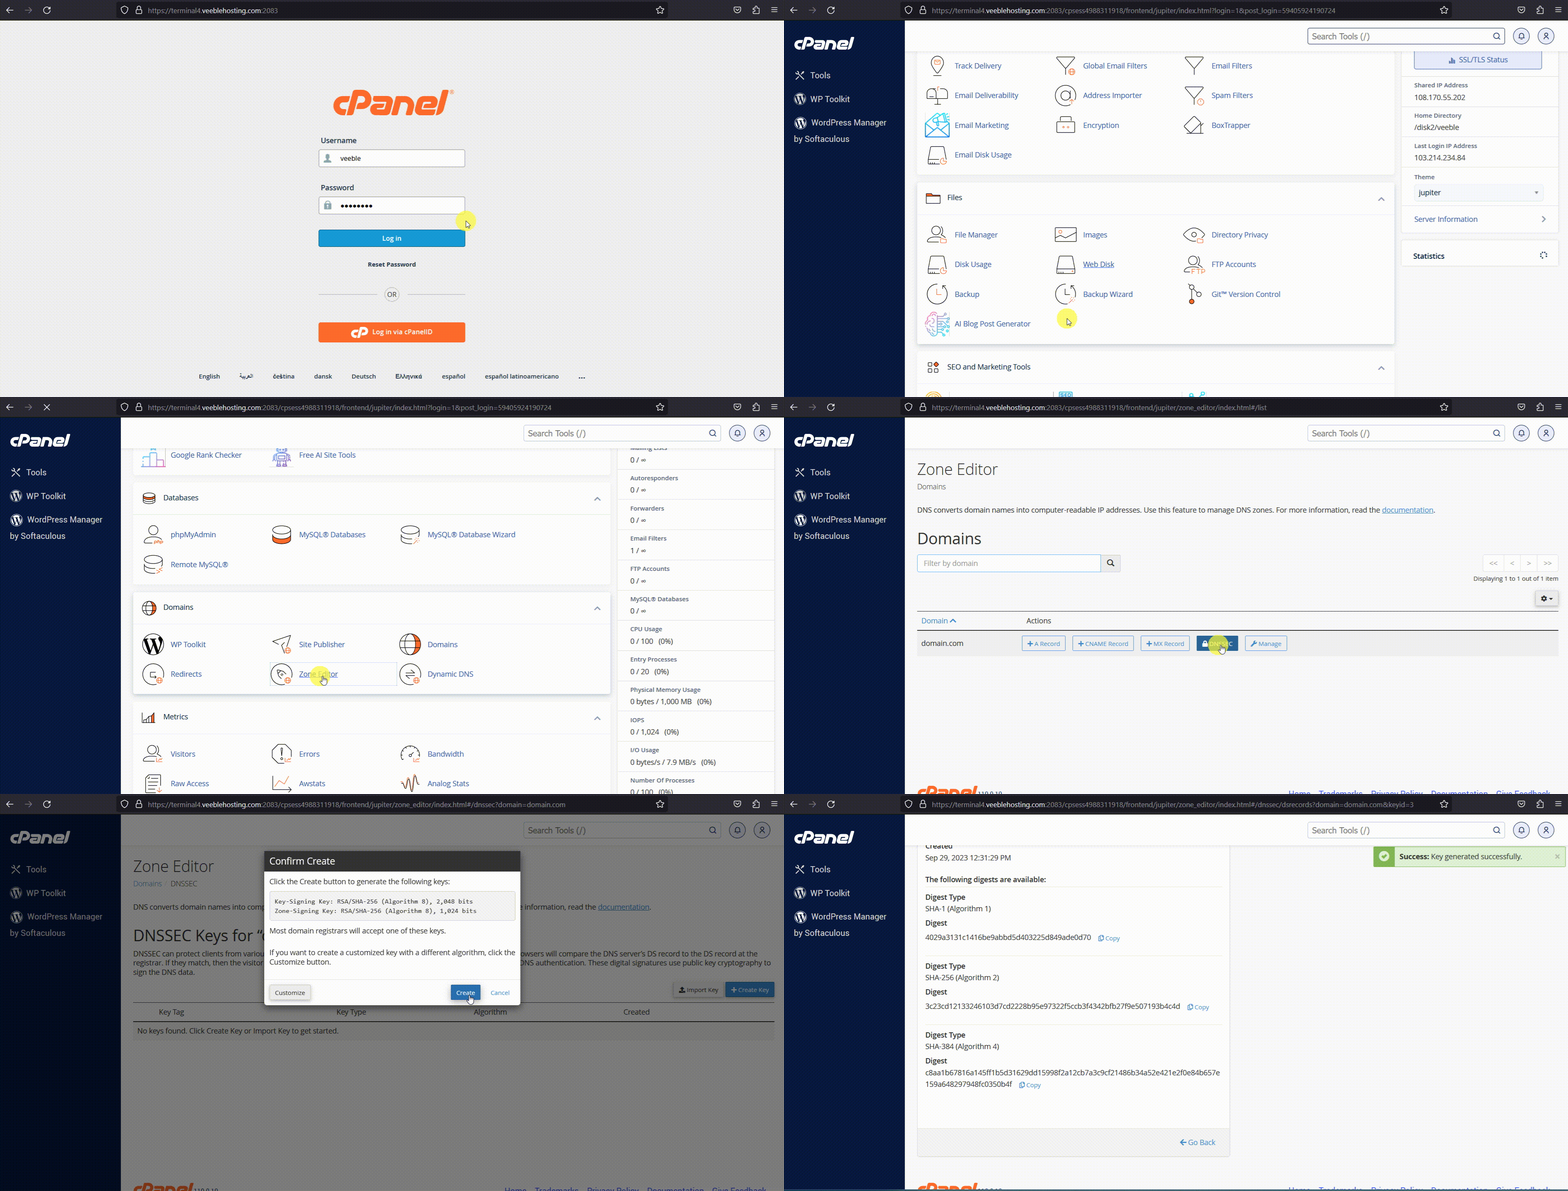
Configuring DNSSEC in cPanel:
- Access the “Zone Editor” in your cPanel dashboard.
- Click the “DNSSEC” button next to the domain you want to secure.
- Click the “Create key” option.
- On the popup screen, click the “Create” button. This generates a key and displays cryptographic keys for configuring DNSSEC.

Configuring DNSSEC from cPanel to Domain Registrar:
- Copy the keys provided (including ‘Key Tag’, ‘Algorithm’, ‘Digest Type’, and ‘Digest’) and paste them into your domain registrar’s DNS management interface to activate DNSSEC protection for your domain.
Note: The exact steps may vary depending on your domain registrar’s control panel interface. Typically, when you access the DNS management settings for your domain within the registrar’s interface, you’ll find an option for configuring DNSSEC where you can input and configure the required DNSSEC values.
Enhance your domain’s security with DNSSEC—keeping your online adventures safe and sound in this magical digital realm.
