
All Linux-based systems come with a powerful root user who grants full machine privileges by default. This essentially implies that, upon your initial access to your Linux-based machine, you are effectively assuming the role of a superuser with unrestricted control. Nevertheless, for security reasons, it is strongly recommended to proactively disable direct root login via SSH.
Disabling root login serves as a crucial security measure to prevent unauthorized access to your Linux-based system by any other user. It effectively limits access to superuser privileges, ensuring that no one can gain unrestricted control through root access over SSH.
To maintain a secure environment, we recommend creating an additional user account while adhering to best security practices. You can configure this new user with nearly all the necessary superuser privileges, providing a safer and more controlled approach to managing your system without compromising security
In this article, we’ll walk you through this process step by step.
Step 1: Create a New User and Set a Password
To start, let’s create a new user and set a password for them. Replace “user1” with your desired username:
[root@nayana ~]# useradd user1

[root@nayana ~]# passwd user1
Make sure to securely store this password, as you will require it whenever you use sudo to gain privileged access.
Step 2: Generate an SSH Key Pair
Now, let’s generate an SSH key pair for the user. This key pair will enhance security and convenience for authentication:
sudo -u user1 ssh-keygen -t rsa
This command generates an RSA key pair and saves it in the user’s home directory, typically at /home/user1/.ssh/. Ensure the private key remains safe.
Step 3: Add the Public Key to Authorized Keys
To enable key-based authentication, we need to add the generated public key to the user’s authorized_keys file located in ~/.ssh:
sudo -u user1 mkdir -p /home/user1/.ssh
sudo -u user1 chmod 700 /home/user1/.ssh
sudo -u user1 touch /home/user1/.ssh/authorized_keys
sudo -u user1 chmod 600 /home/user1/.ssh/authorized_keys
cat /home/user1/.ssh/id_rsa.pub >> /home/user1/.ssh/authorized_keys
Step 4: Grant Sudo Privileges
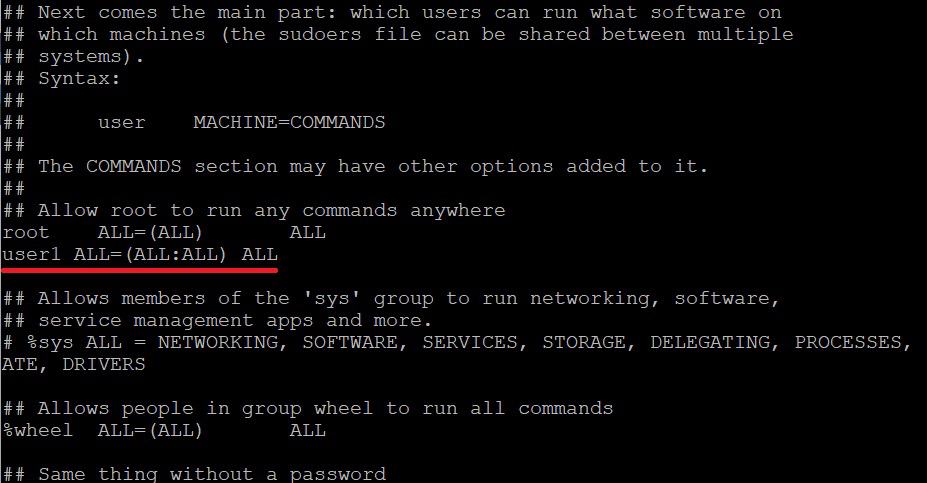
To grant your new user sudo privileges, add them to the sudo group. Open the sudoers file using and insert this line:
user1 ALL=(ALL:ALL) ALL
sudo visudo
Step 5: Disable Root Login
For enhanced security, let’s disable root login via SSH. Edit the SSH daemon configuration:
vi /etc/ssh/sshd_config
Locate the line that reads PermitRootLogin and change it to:
PermitRootLogin no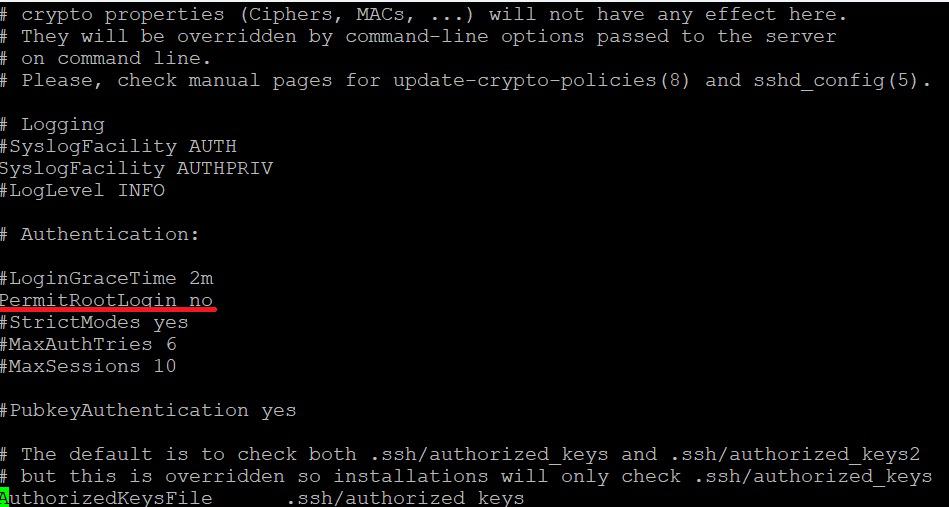
Finally, restart the SSH service:
systemctl restart sshdThese steps will ensure that your system is secure and configured for safe and efficient management.
Now, the “user1” should be able to SSH into the server using their private key and will have sudo privileges, while root access via SSH is disabled. Make sure to securely store the private key on the user’s local machine and follow best practices for SSH security.